The rental kitchen is a unique design challenge. You cannot rewire, re-tile, or re-pipe. You probably should not even paint without a long email chain to your landlord. Yet you spend hours every week in this room, staring at beige walls, scuffed linoleum, and cabinet hardware that looks like it was selected by a person who hated joy. The instinct is to tolerate it. The smarter move is to treat the kitchen like a stage set: everything must look permanent to the eye while remaining temporary to the wall.
The legal reality is straightforward. As RentCafe outlines, landlords can deduct from your deposit for damages caused by negligence or misuse, including large holes in walls, unauthorized paint colors, broken fixtures, or excessive dirt. Normal wear and tear—small scuffs, faded paint, minor carpet thinning—is not deductible. The line between the two is where most deposit disputes live. The upgrades below are designed to land firmly on the safe side of that line. They leave no trace, require no tools that can puncture drywall, and cost less than a grocery run.
The Reversibility Rule: If It Cannot Go Back, It Does Not Go Up
Before spending a dollar, internalize the reversibility rule. Any upgrade you install must be uninstallable by you, alone, in one afternoon, using only your hands and maybe a hairdryer. If the project requires a drill, a stud finder, or a prayer, it is not a rental upgrade. It is a renovation, and renovations require permission, permits, and the willingness to lose your deposit. As real estate broker Robbie Randolph told NBC Select, any changes made to a leased space must be returned to the original condition upon move-out. That does not mean you cannot improve the space. It means you must improve it like a magician: the audience sees the illusion, but the props vanish without a trace.
This philosophy immediately eliminates some popular Pinterest ideas. Floating shelves that require anchors? No. Under-cabinet lighting that needs hardwiring? No. Replacing the actual faucet? Maybe, if you are a plumber, but one drip behind the wall and your deposit is gone. The list below sticks to surfaces, hardware, and accessories that interact with the existing kitchen the way a sticker interacts with a notebook. They adhere, they perform, they peel away.
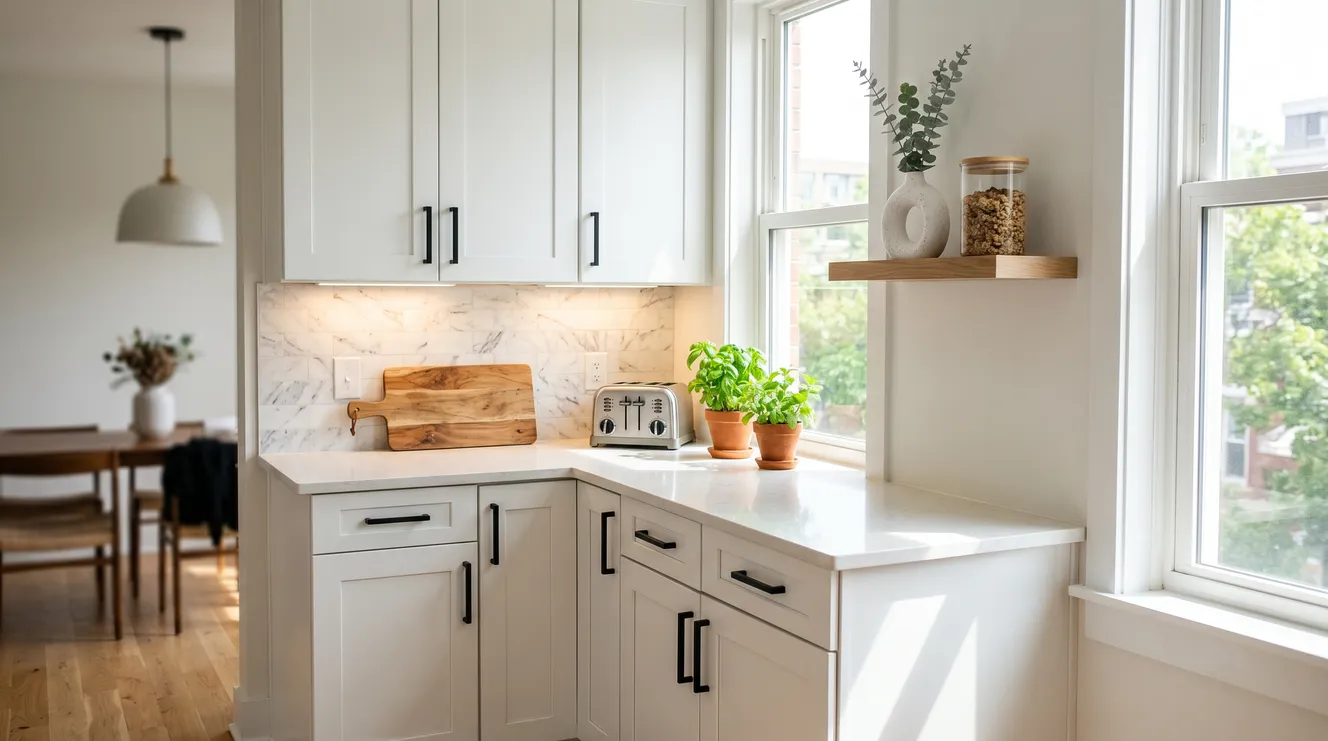
Upgrade 1: Peel-and-Stick Backsplash (Cost: $20–$35)
The backsplash is the face of the kitchen. It is what your eye lands on when you walk in. Unfortunately, rental backsplashes are often either absent or designed in a color best described as “institutional regret.” Peel-and-stick tile has become the renter’s secret weapon because it mimics ceramic, glass, or stone without the grout, the glue, or the permanence. A recent rental transformation featured in Architectural Digest used WallPops peel-and-stick tiles at roughly $20 for a pack of ten, covering an entire kitchen floor and backsplash area for under $100. For a single backsplash wall, you can often complete the job for $30 or less.
The product quality has improved dramatically. Modern vinyl tiles are thick, moisture-resistant, and cleanable. The real concern is removal. Some renters report that aggressive adhesives can pull paint or leave residue. The professional workaround, demonstrated by a designer in Apartment Therapy, is to first apply a layer of removable vinyl shelf liner—similar to peel-and-stick wallpaper—to the wall, then install the tiles on top of that liner. When move-out day arrives, you remove the tiles, then remove the liner, and the wall behind is untouched. It is a $5 insurance policy on a $1,000 deposit.
Installation requires patience, not skill. Clean the wall with degreaser, measure twice, cut with a sharp utility knife, and press from the center outward to eliminate air bubbles. A hairdryer softens the adhesive during removal, allowing the tile to release without argument. The entire project takes one evening, and the visual impact is disproportionate. A kitchen that looked like a break room suddenly looks like a design choice.
Upgrade 2: Cabinet Hardware Swap (Cost: $15–$25)
Cabinet knobs and drawer pulls are the jewelry of the kitchen. They are small, they are cheap, and they are shockingly easy to replace. Most rental cabinets use standard screw spacing, and a multitool from any hardware store can handle the swap in under thirty minutes. The key is storage, not selection. As one NBC Select editor described, she installed new clear glass knobs, then placed the original hardware in a bag underneath the sink. On move-out day, she simply reinstalled the originals and took her upgrades to the next apartment.
This is the perfect example of investing in decor that travels. A $20 set of brass or ceramic knobs changes the entire emotional temperature of a kitchen. The existing hardware might be yellowed plastic or brushed nickel from a decade you do not wish to remember. Replacing it sends a signal that the space is curated. Because the screws use the same holes, there is no wall damage, no patching, no dispute. It is the lowest-risk upgrade on this list, and the return on investment is immediate.
Upgrade 3: Contact Paper Counter and Shelf Refresh (Cost: $10–$20)
Rental countertops are often the color of wet cardboard. They stain easily, they date quickly, and they make cooking feel like a chore performed in a hospital cafeteria. Contact paper—specifically modern peel-and-stick vinyl designed for countertops—offers a complete visual reset. NBC Select recommends waterproof, self-adhesive contact paper that is compatible with kitchen surfaces and available in finishes that mimic marble, granite, or warm wood grain.
The application is forgiving. Unlike tile, contact paper is repositionable during installation. If you create a bubble, you lift and smooth. If you misalign a seam, you peel and adjust. A single roll covers approximately 15 to 20 square feet, which is often enough for a galley kitchen counter or several cabinet shelves. The material is heat-resistant to normal cooking temperatures and wipes clean with standard spray.
Removal is where the product earns its renter-friendly label. High-quality contact paper releases cleanly within a one- to three-year window. If you leave it for a decade, the adhesive may cure and require a scraper, which risks surface damage. The rule of thumb is to refresh or remove it before your lease ends. If you are a serial renter, consider this a two-year temporary finish rather than a permanent solution. For $15, that is a fair trade.
Upgrade 4: Battery-Powered LED Lighting (Cost: $15–$30)
Rental kitchens are notoriously underlit. A single ceiling fixture casts shadows over every cutting board and creates a cave-like atmosphere that makes 5:00 PM feel like midnight. The upgrade is not replacing the fixture. It is augmenting it with battery-powered LED puck lights or motion-sensor strips.
Modern LED pucks attach with adhesive backing or small magnetic mounts. Tuck them under upper cabinets to illuminate the countertop. Place one inside a deep pantry so you can actually see the canned goods. Add a motion-sensor strip above the sink. The light quality has improved to the point where warm-white LEDs now mimic incandescent bulbs without the blue glare of early-generation products. Most run on AA batteries or USB-rechargeable packs, and a single charge lasts months.
Because there is no wiring, there is no landlord involvement, no electrician, and no risk of damaging walls beyond a small adhesive dot that removes with rubbing alcohol. When you move, you peel them off and take them with you. The next renter gets the same dim cave they started with, and you get to keep the lighting system for your next kitchen.
Upgrade 5: Tension Rods and Command Hooks for Vertical Storage (Cost: $10–$20)
Rental kitchens often suffer from a lack of usable storage. Drawers are shallow. Cabinets are awkward. The solution is to stop storing things inside cabinets and start storing them on walls and in windows—without drilling. A tension rod installed inside a window frame can hold herb planters, allowing sunlight to hit your basil while freeing counter space. Command hooks on the backsplash can suspend utensils, oven mitts, or a small colander. A stick-on paper towel holder under the cabinet removes the need for counter-standing models.
The physics are simple. Tension rods rely on pressure, not screws. Command strips rely on adhesive rated for specific weights. As long as you respect the weight limits and remove them properly—pulling the tab straight down, not toward you—they leave zero residue and zero holes. This category of upgrade is less about aesthetics and more about function. A kitchen that stores efficiently feels larger, cleaner, and more expensive, even if every component came from a big-box store and costs less than a pizza.
Upgrade 6: Faucet Aerators and Temporary Fixtures (Cost: $8–$20)
You cannot replace the faucet in a rental without risking a plumbing disaster. But you can replace the aerator—the screw-on tip that controls water flow and spray pattern. A new aerator with a swivel head or a pull-down sprayer attachment threads onto the existing faucet in seconds and transforms the sink from a trickle into a functional workstation. When you leave, you unscrew it and reinstall the original.
Similarly, a stick-on soap dispenser, a magnetic sponge holder, or a suction-cup sink caddy improves daily ergonomics without altering the sink basin. These are micro-upgrades, but they accumulate. A sink that actually sprays where you aim it, a sponge that dries instead of molding, and a soap pump that does not require balancing on the counter edge are daily quality-of-life improvements. For under $20 total, they are the cheapest sanity preservation available.
The Move-Out Audit: Protecting Your Money
Even reversible upgrades require a reversal. The most common mistake renters make is installing beautiful temporary improvements, then forgetting to remove them before the final walkthrough. A landlord seeing a peel-and-stick backsplash might not care, but they might also charge you for “removal of unauthorized materials” because they can. Legal guidelines confirm that landlords can deduct for repairs required to return the unit to its original condition, which includes taking down anything you added.
Schedule your removal for at least one week before move-out. This gives you time to clean residue, patch any minor issues, and photograph the restored condition. Documentation is your armor. Take timestamped photos of every wall, counter, and cabinet after your upgrades are removed. If a landlord attempts to deduct for damage that was either pre-existing or caused by normal use, those photos are your evidence. RentCafe advises that both move-in and move-out inspection reports, paired with photos, provide the proof necessary to challenge unfair deductions.
The other half of the audit is cleaning. Excessive dirt is a deductible offense in most jurisdictions. A kitchen that looks clean to you might still have grease film on the backsplash wall, adhesive residue under cabinets, or dust bunnies behind the fridge. Deep-clean before the landlord inspects. The $50 you spent on upgrades should not be overshadowed by a $150 cleaning deduction because you left a sticky spot where a Command hook used to live.
The Pre-Installation Checklist
Photograph everything. Before touching a wall or cabinet, document the original condition with dated photos.
Store the originals. Bag old knobs, aerators, and shelf liners together in one labeled box that moves with you.
Test adhesion. Apply a single tile or a one-inch strip of contact paper in an inconspicuous spot; remove it after 48 hours to check for wall damage.
Read the lease. Some landlords explicitly ban adhesives or alterations; know the rules before you spend.
The Kitchen You Rent Can Still Be the Kitchen You Love
A rental kitchen is not a prison sentence. It is a temporary assignment that deserves temporary solutions. The upgrades above do not require a contractor, a permit, or a negotiation with your landlord. They require an afternoon, a $50 bill, and the willingness to believe that your environment affects your daily life even if you do not own the deed. The peel-and-stick tile does not know it is temporary. The new cabinet knob does not care that it will be unscrewed in a year. While they are in place, they serve you. They make the coffee ritual nicer. They make the dinner prep less depressing. They make the space feel like yours.
And when the lease ends, you take them with you or erase them completely. The landlord gets their beige box back. You get your deposit back. And you get the satisfaction of having lived in a kitchen that reflected your taste, not the taste of a property manager who picked finishes in 2004. Start with the hardware. Add the backsplash. Light the counter. Spend less than a dinner out. The return is a home that feels like home—even if the mortgage belongs to someone else.
That is not just smart renting. That is smart living.